Hi!
One of the things I have been meaning to show you are the four knots. There are actually five, but they are originally called the four knots.
These are knots that you tie and, if you do them correctly and in the right order, you'll find yourself with a beautiful knotted bracelet! And don't worry, there are only five knots that I'm going to show you today!
Today I am just going to show you the knots and then in the future I will do a tutorial on each individual bracelet.
I am also going to add a 'You Will Need' in case you ever want to practise the knots.
- String or floss in two colours
- A clipboard or tape and a flat surface
- Scissors

The first knot is the overhand knot. This isn't actually one of the four knots but you need it to start and finish knotted bracelets so I included it in. Firstly, you want to make a loop out of you string, using only a small amount from the top.

Then pull the tail through the loop,

And pull tight.

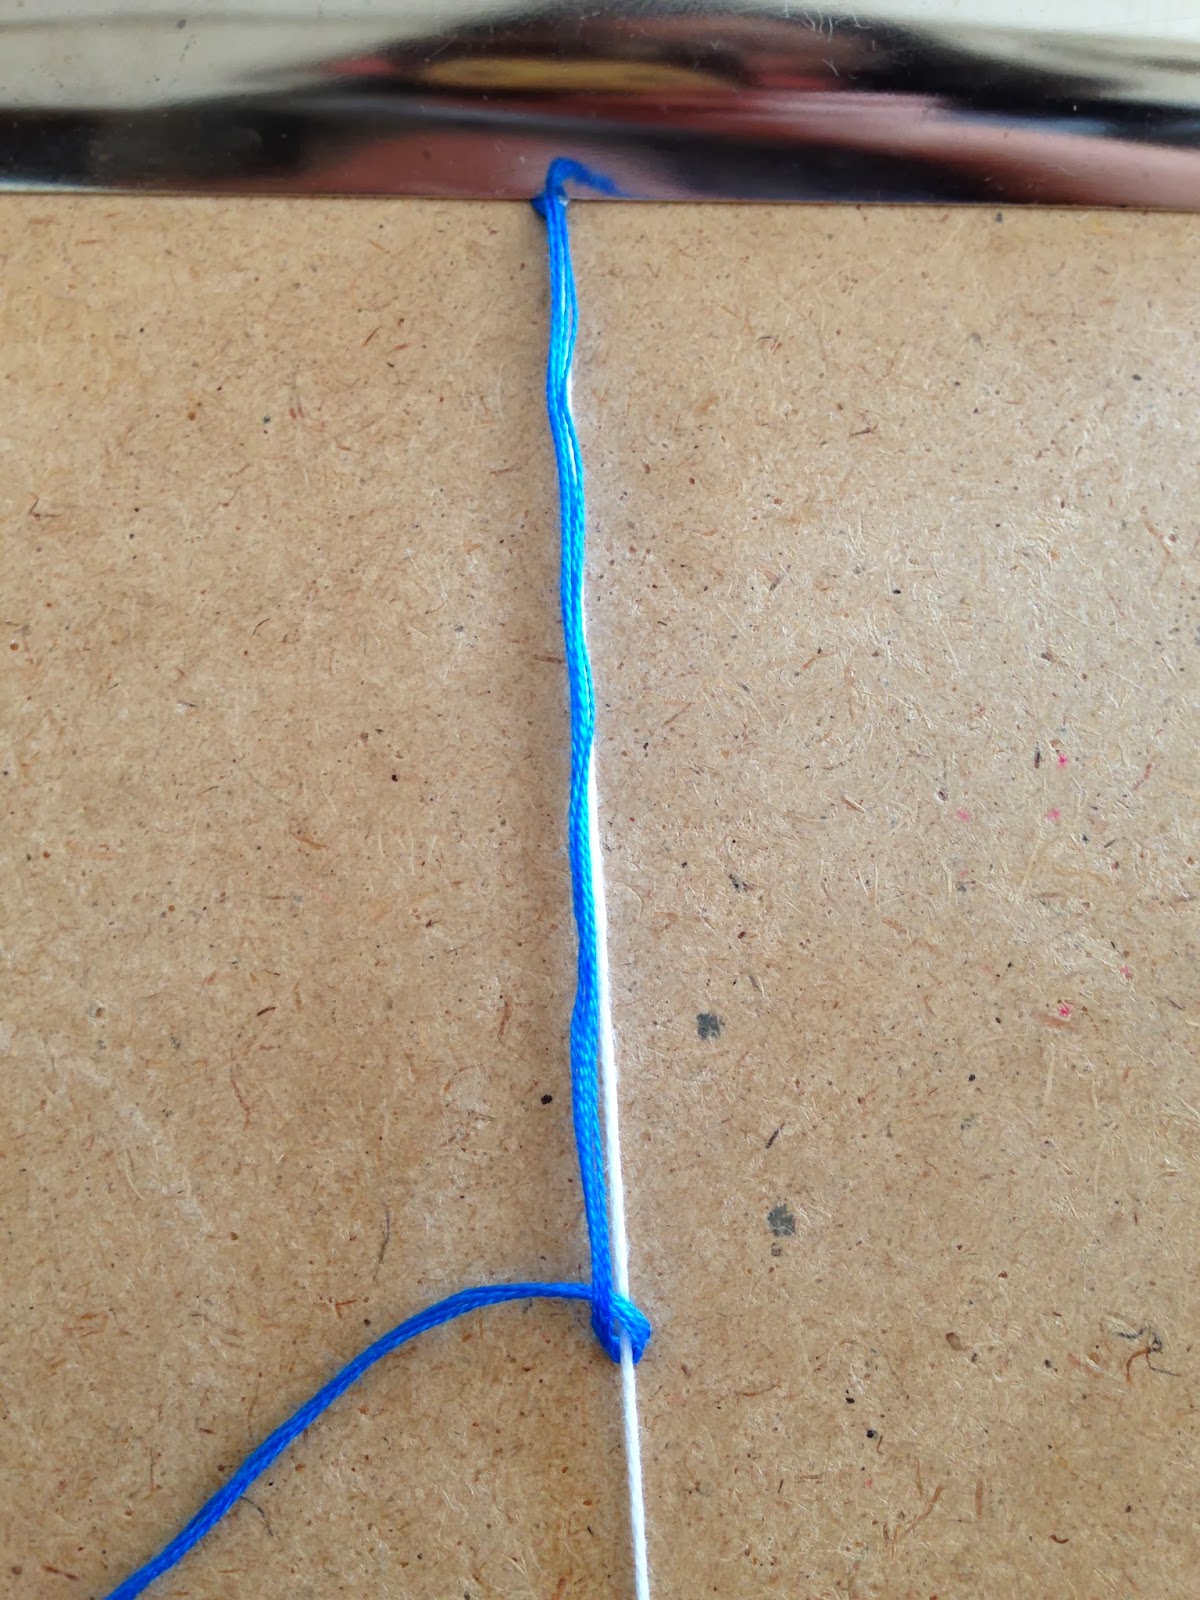
Then put the string in your clipboard or tape down where the knot starts.

The next knot is called the forward knot. It's called the forward knot because it's a forward '4' shape. You get the left-most string and pull it over the string next to it in a four shape.

Then pull the tail into the loop..

And pull tight!

Then repeat this again. Each individual knot needs to have two 'fours' pulled tight.

This is what the forward knot should look like. Notice the white string (the left-most string) is now on the right of the string it was knotted around.

The next knot is the backwards knot. It is the exact same as the forward knot; just the other way round. Make a backwards four..

And pull it up tightly.

Repeat this again.

This is what the backwards knot looks like. Notice the white string is now on the left of the string we knotted it around.

The next knot is the forward-backward knot. To do this, you do half a forward knot and half a backward knot so make a forward four..

And pull up tight.

Then make a backwards four.

And pull up tight!
This is what a forward-backward knot looks like. Notice the leftmost string is till on the left.

Now for the backward-forward knot. All you need to do is half a backwards knot and half a forwards knot. So make a backwards 4..

And pull it up tightly (being different!)

Then make a forward knot..

And pull it up making sure its tight!

This is what a backward-forward knot looks like. As you can see, the blue string is still on the right.

Then finish everything of with another overhand knot, shown at the top.

Hope this was clear and I will be putting on some bracelets in a few weeks. Until then, practise these knots. The overhand, forward and backward knots are the most common and are used very often. The forward-backward and backward forward knots are used, just in more complex patterns.
Miss Chubby Fingers (MCF)
Origami Easter Bunnies | Easter Crafts
Hi!
Today I want to show you how to make this very cute Easter bunny using origami! You can decorate these however you like and with whatever faces!

You Will Need:
- A sheet of paper, coloured or white.
- A marker, pencil or crayon.
First, fold your square paper in half diagonally and then in half the other way, diagonally again.

Then fold the edge up, around maybe 2cm. I just eyeballed it!

Then fold both sides in to the middle.

Flip your work over and fold a small triangle at the top.

Then fold it back and tuck it in.

Them fold a triangle back from the bottom.

Then draw on a cute little face!
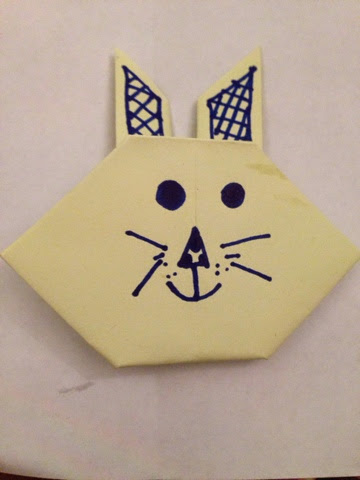
I tried making different faces on my bunnies!

And that's it!

These are really cute and really easy! They take a few minutes to fold so you can make some and then experiment with different faces! I hope you try to make these bunnies yourself and they turn out great!
Miss Chubby Fingers (MCF)
I found the idea on Pinterest.
Easter Bunny Headband | Easter Crafts
Hello again!
So I found this really cute headband craft that I had to share with you all! This craft is really simple and really cute!
You Will Need:
- A few sheets of white paper
- Scissors
- A tape measure
- A pencil
- Glue
- A pink marker or pink paper

First, measure around your head with your tape measure. Then transfer the measurement onto the page.
Mark it with a pencil. Then make marks one inch from the page so you will have one or a few strips of paper, one inch long. Don't worry if you have to stick a few strips of paper together. Cut your strip(s) out and glue together.


Mark it with a pencil. Then make marks one inch from the page so you will have one or a few strips of paper, one inch long. Don't worry if you have to stick a few strips of paper together. Cut your strip(s) out and glue together.


Then make two curved ear shapes on a piece of white paper. Then draw two smaller ear shapes next to the larger ones. Fold the page in half so the ears will be sturdy. Cut both sizes out and colour the smaller ears in pink (or draw the smaller ear shapes on pink paper straight away.)

Then glue the pink paper on to the white paper and glue the ears on to the headband strip you made at the start.


And that's it!

I hope you make these and wear them around on Easter to get your family in the spirit!
Miss Chubby Fingers (MCF)
I found the idea on Pinterest.
---------------------------------------------------------
Egg Shell Art | Easter Crafts---------------------------------------------------------
Hi!
Before I start with the tutorial I wanted to apologise for not posting last week. My mum, dad and I went for a short trip down the country and I was not able to post anything.
Anyway, this craft idea is really simple but very effective, especially since Easter is coming up!
You Will Need:
- An Easter themed image
- Glue (CLEAR works best)
- Egg shells - I put mine in the oven to harden
- Sharpie pens or other markers, in different colours

If you want to use the same image as me, here it is!

Anyway, to make the cracked egg effect, start by cracking an egg shell.


Then, pick a piece you think will fit neatly in the place of what you want to eggshell. In my case, a bow.

Then colour that eggshell piece in with one of your sharpies.


And glue it down. When I glued it down, I also cracked it a little.

And repeat the pattern...

I decided to only eggshell some of my picture so I coloured in the parts I wouldn't cover.

Then, for the eggs, I coloured three of the eggs in and egg shelled two of them. For the two I covered, I did reversed patterns.

And that's my final piece of work! I hope you enjoyed this tutorial and it was helpful!
Thanks for reading,
Miss Chubby Fingers (MCF)
I found the idea on Pinterest.
---------------------------------------------------------
Rice Krispie Cakes | Easter Crafts
Hi!
Today I really wanted to show you how to make Rice Krispie cakes! These are really easy and really tasty!
You Will Need:
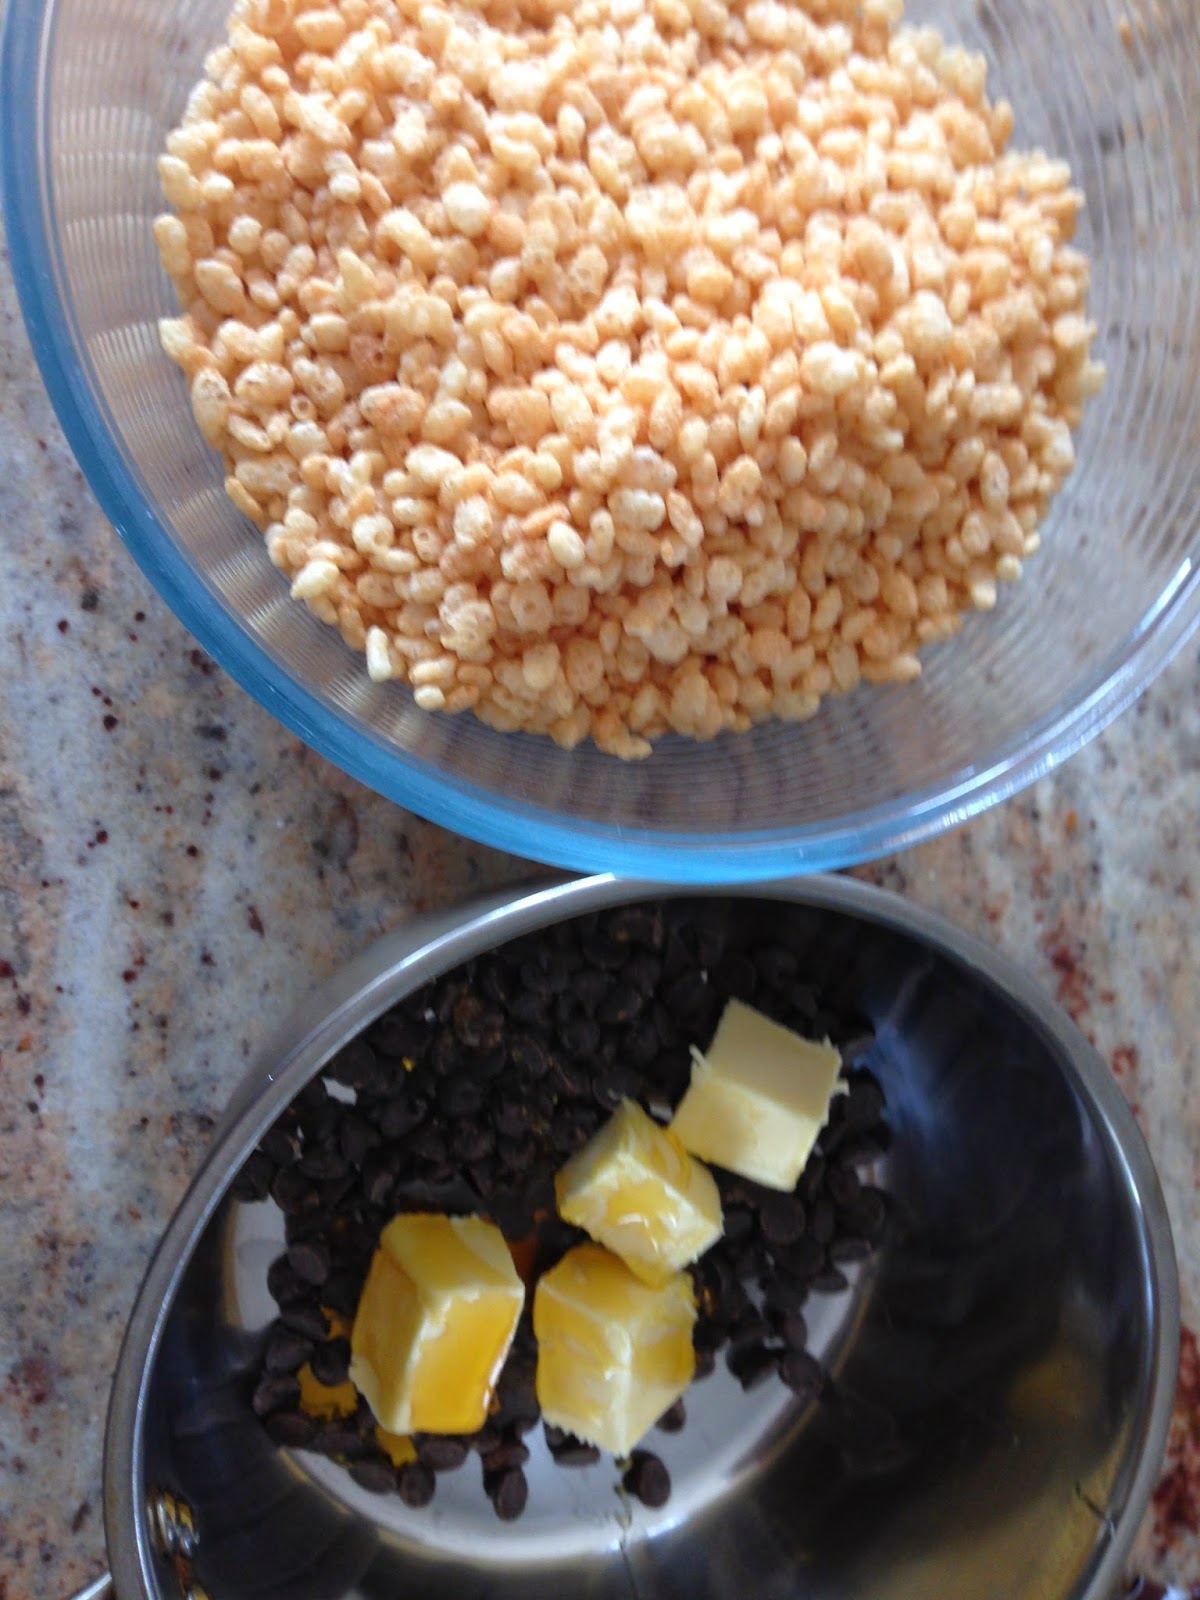
- 100g Rice Krispies
- 3 tbsp Golden Syrup
- 100g Chocolate Chips
- 50g Butter
- Muffin cases and a case tray

I decided to throw some mini eggs on top too!

First, measure out your ingredients. Place your rice krispies in a very large bowl and the butter, golden syrup and chocolate into a pan.
Melt the ingredients in the pan and pour over the rice krispies.

Mix thoroughly and spoon into your cases.


I hope these get you into an easter mood and visit again for another easter craft!
Miss Chubby Fingers (MCF)
Links
---------------------------------------------------------------
A Scented Bouquet | Mother's Day
Hi!
So it's mother's day today and I decided to try flower arranging out and see what I could make. Flower arranging is quite easy but if you're not gentle and willing, like me, it will prove to be quite challenging.
This is my little bouquet:

To make this, I used a small vase, secateurs and some flowers.
The flowers I used were hyacinths and forget-me-nots.
I stripped the leaves of the forget-me-nots that would go under the water and trimmed the stems down. Then I picked up the bunch and placed them in the vase (with water inside). Next I just fiddled with the arrangement until I was happy and then displayed it on a table.
Happy arranging!
Miss Chubby Fingers (MCF)
---------------------------------------------------------------
I love you... Card | Mother's Day
Hello again!
So as you know, mother's day is coming up soon and I was planning to do a gift, card and treat. Last week I made a wool wrapped bottle and this week I'm making a card. This card is really cute and simple and I hope you like it!

You Will Need:
- A glue stick
- Ruler
- Pencil
- Pen
- Scissors
- Two sheets of card/paper, different colours

First, Fold one sheet in half. This sheet will have the start and end of the message on.

Then trace around your hand.

Cut around the hand tracing. Two hands should come out as you folded it in half.

Then write 'We love you..' or 'I love you...' on the front of one.

And then 'Love from...' on the other one. Make sure the hands line up correctly.

Then cut a strip out of your other card. Mine was around 1".

Cut the strip out.

Accordion fold your strip...

And cut of the tail.

This is what it should look like when you stretch it out.


Stick it to the back of your hands.

This is what it should like!

This is a really nice little card which is really easy to make. It's really sweet and I really enjoyed making it. Make sure you line both hands up. Also, you can write a personal message on one of the hands!
Miss Chubby Fingers (MCF)
Links

-----------------------------------------------------------------
Wool Wrapped Bottle | Mother's Day
Hi!
Mother's Day is approaching and I thought it was time to start making gifts and cards. This craft is really fun and addicting! It's really easy and you can be as creative as you like!
You Will Need
- Paintbrush
- Scissors
- Glue
- Wool in different colours
- Newspaper
- An empty glass bottle
TIP>> The neck of the bottle is hardest so try and pick an easy bottle for your first bottle and don't give up!

First, choose your wool.

Then apply a thin layer of glue onto the end of the bottle.

Start to wrap the wool. Try to keep it tight. Keep all the ends at the back of the bottle and change the amount of wrapping you do to give it a nice effect.

Keep doing this until you reach the top of the bottle. You may need to go over the ends with more glue. This is what my first bottle looks like!

This redecorated bottle can be used as a vase so, to finish it all off, add some flowers or leafs and pop on your windowsill or dining table!
Miss Chubby Fingers (MCF)
Links
Wrapped Bottle
-----------------------------------------------------------------
Home Made Pizza!
Hi again!
Today we are going to make home made pizzas!
This is really simple and you most likely will have all the ingredients sitting around at home right now!
You will need
- Flat bread
- Ketchup
- Cheese
- Pastrami
.JPG)
Of course this is just a guideline. It is you pizza and you can put whatever you want on it! Let's begin!
First, lay out your flat breads.
.JPG)
Then squirt on your ketchup. Here I wrote 'Hi' and a F over a C.
.JPG)
.JPG)
Then grate some cheese,
.JPG)
.JPG)
.JPG)
Put the pizza on a tray. Bake it at around 200° for 5 minutes. I put mine in the aga for 5 minutes.
.JPG)
.JPG)
This is what it should look like once you're done!
.JPG)
And that's it! How to make easy and yummy pizza!
Miss Chubby Fingers (MCF)
-----------------------------------------------------------------
Simple Arrow Bracelet
Hi!
Miss Chubby Fingers here!
Anyway, today I knew I wanted to do a bracelet tutorial but didn't want to over complicate it. I searched for easy bracelets and this came up:
.JPG)
It looks really simple and it really is. The key to it is to keep tight. So this is what you need :
You will need:
- Scissors
- Tape or a clipboard
- Thread, floss or wool
.JPG)
First, you want to cut your string. I cut from my wrist to my elbow and added a bit extra and I had plenty extra. You need to cut 6 strands of each colour.
.JPG)
Then, you want to tie them together with a simple knot, attach it to the clipboard or tape it down on a surface and set out like shown below.
.JPG)
Then cross the right strand into the middle and then the left into the middle, like shown.
.JPG)
Repeat with the next colour.
.JPG)
And repeat.
.JPG)
This is what it should look like. That is the method of it. But you need to do it a lot tighter.
.JPG)
.JPG)
Check it fits round your wrist and then tie a simple knot at the end like shown.
.JPG)
Cut the excess thread.
.JPG)
It should look like this.
.JPG)
And viola! I tied it on using the square knot but you can just tie it on.
.JPG)
Miss Chubby Fingers (MCF)
Links
The original tutorial
-----------------------------------------------------------------
2 Simple Origami Bookmarks
Hi!
Welcome to my blog, My Chubby Fingers, and my first post. I am a crafter and a baker. I have had this blog for a while but just started to use it. You may have already met my mum, Mrs Green Fingers. She will do gardening posts.
Anyway, today I will be showing you how to make 2 simple origami bookmarks as shown below:

There is a woven bookmark using a strip of paper and a corner bookmark using a square piece of paper.
The first bookmark is a corner bookmark.
You Will Need
- A square piece of paper
- A book

Start with a square piece of paper,

And fold in half diagonally.

Then fold up the corners like shown above and below.

Then fold the top corner down to the bottom edge.

Then refold the corners up.


Then tuck those corner into the pocket you just made.


Ta Da!!!! Done! If you like, you can tuck the flappy triangle into the other triangle to have a triangle bookmark instead of a square one!


Now for the woven bookmark!
You Will Need
- A strip of paper
- Scissors

Fold the strip of paper in half
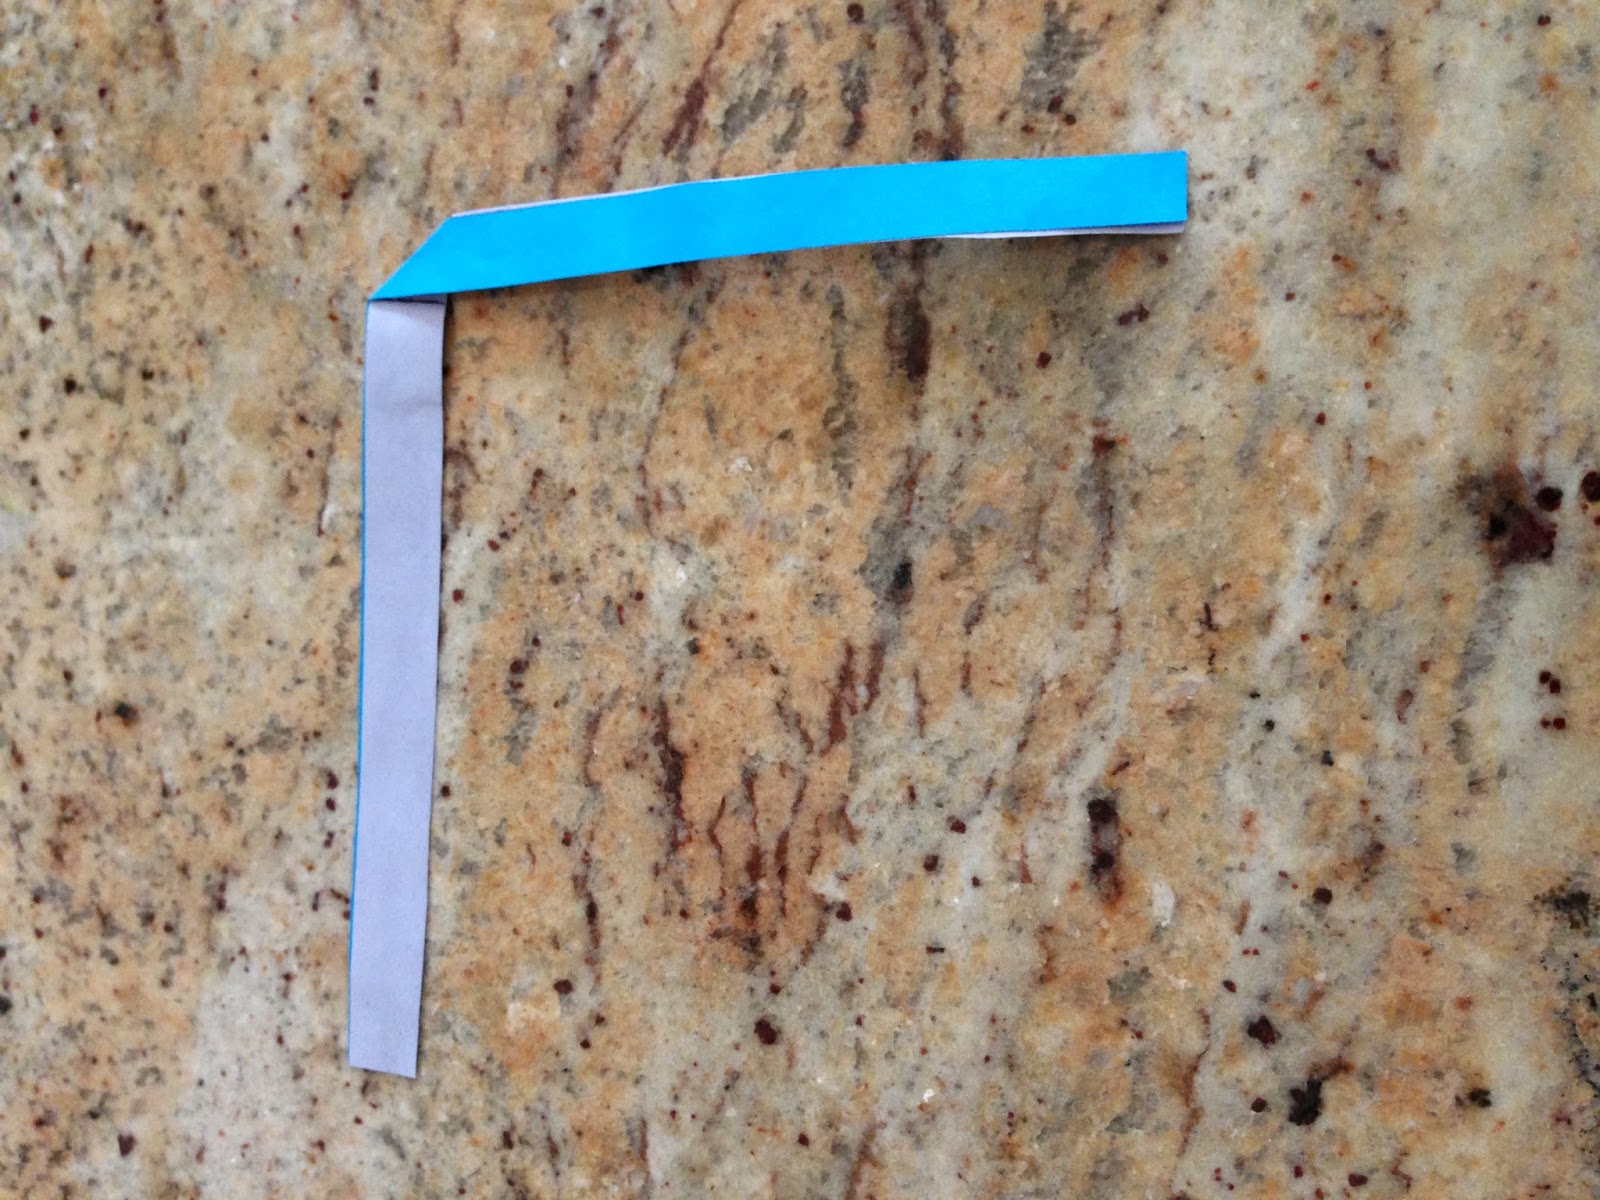
Unfold and fold half the paper down on that crease at a 45° angle.

Then fold that part of the page down again at a 45° angle.

Flip the page round.

Then fold that piece of paper down again at another 45° angle.

Put that last folded strip behind the other strip.

Now you just repeat. So you fold the piece of paper down at a 45° angle.

Then flip.

Fold the strip down at a 45° angle.

And put behind the other strip.

Fold the strip down at a 45° angle.

And flip.

To finish of, you trim the ends and slot them into other strips of paper. If you struggle with this, you can glue it but slotting it in does work.

TIP >> To make a degrees sign (°), you hold Alt and press 248 on the side keyboard.
Miss Chubby Fingers (MCF)
Links
How to type a degrees sign
Woven Bookmark
Corner Bookmark
No comments:
Post a Comment